One of the worst deck ledger board failures I ever saw didn’t look dangerous at all. That’s because the failure usually isn’t visible until the deck falls off the wall. My company was bidding on a project for a client that wanted to expand their existing deck. I’d have to replace some of the decking boards that had aged but keep as much as I could and then add on.
The deck felt solid. The ledger board looked straight. There were no obvious signs of trouble from the outside.
But as we pulled off the first few deck boards nearest the house, the rim joist behind the ledger was badly rotted. Water had been finding its way into the wall assembly for years and nobody knew it. The damage wasn’t visible because it wasn’t happening on the face of the board. It was happening behind it. The problem? No flashing.
That’s what makes deck ledger board failures so dangerous.
Most homeowners think a deck ledger board fails because it wasn’t strong enough. Missing flashing is usually the root cause, but the actual rot often starts around the fastener penetrations because that’s where water enters the wood. Water follows those fasteners into the wood, becomes trapped behind the ledger, and slowly rots both the ledger board and the rim joist supporting it.
By the time the problem becomes visible, the structural damage is often already significant.
That’s why a properly installed deck ledger board isn’t just about bolts and lumber. It’s about flashing, drainage, and understanding how water moves through a wall assembly. Get those details right and the ledger may last for decades. Get them wrong and you’re building a structural problem you won’t discover until years later.
What a Deck Ledger Board Actually Does
A deck ledger board is a piece of pressure-treated dimensional lumber fastened directly to the house framing — typically the rim joist — that carries one end of the deck joists and transfers the deck’s load into the house structure.
The International Residential Code requires decks to support 50 pounds per square foot — 10 pounds of dead load from the deck itself and 40 pounds of live load from people and furniture. The ledger board is the connection point where that load transfers from the deck into the house. When that connection fails, the deck fails.
The ledger board is not decorative and it is not optional on an attached deck. It is a structural component and the code treats it accordingly.
Why Deck Ledger Boards Fail
People often assume deck ledger board failure is a load problem.
Most of the time it isn’t. In the field, most ledger failures come down to three issues.
1. Fastener Penetrations Without Proper Water Management
Every lag screw or bolt driven through a deck ledger board creates a potential pathway for water. If flashing and waterproofing aren’t directing water away from those penetrations, moisture follows the fastener shaft into the wood.
That’s where many failures actually begin.
The face of the ledger may look fine while the wood around the fastener is slowly deteriorating. Once decay reaches the rim joist, the connection can lose significant structural capacity even though everything still looks sound from the outside.
2. Missing or Incorrect Flashing
If the flashing is missing, the clock is already ticking. The only reason some unflashed ledger boards survive for years is that they happen to be protected from direct water exposure.
But I’ve seen plenty of decks with flashing installed and still failing.
The problem wasn’t the flashing itself. The problem was the sequence.
Water management only works when every layer overlaps the layer below it. When flashing is installed out of order, reverse laps occur and water gets directed into the wall assembly instead of away from it.
Water always wins. Give it a path into the wall and eventually it will take it.
3. No Drainage Gap
Years ago it was common to bolt a ledger board tight against the house.
We know better now.
Even a well-flashed ledger will occasionally see moisture behind the board. Without a drainage gap, that moisture has nowhere to go. It remains trapped between the ledger and the wall, creating ideal conditions for decay.
Whether the ledger is installed tight to the wall or spaced away from it, the flashing and drainage details must keep moisture from becoming trapped behind the board.
The Flashing Sequence — Why Order Matters
Flashing a deck ledger board correctly is a sequenced process. Getting the sequence wrong is functionally the same as not flashing it at all.
One reliable sequence for a conventionally attached ledger is:
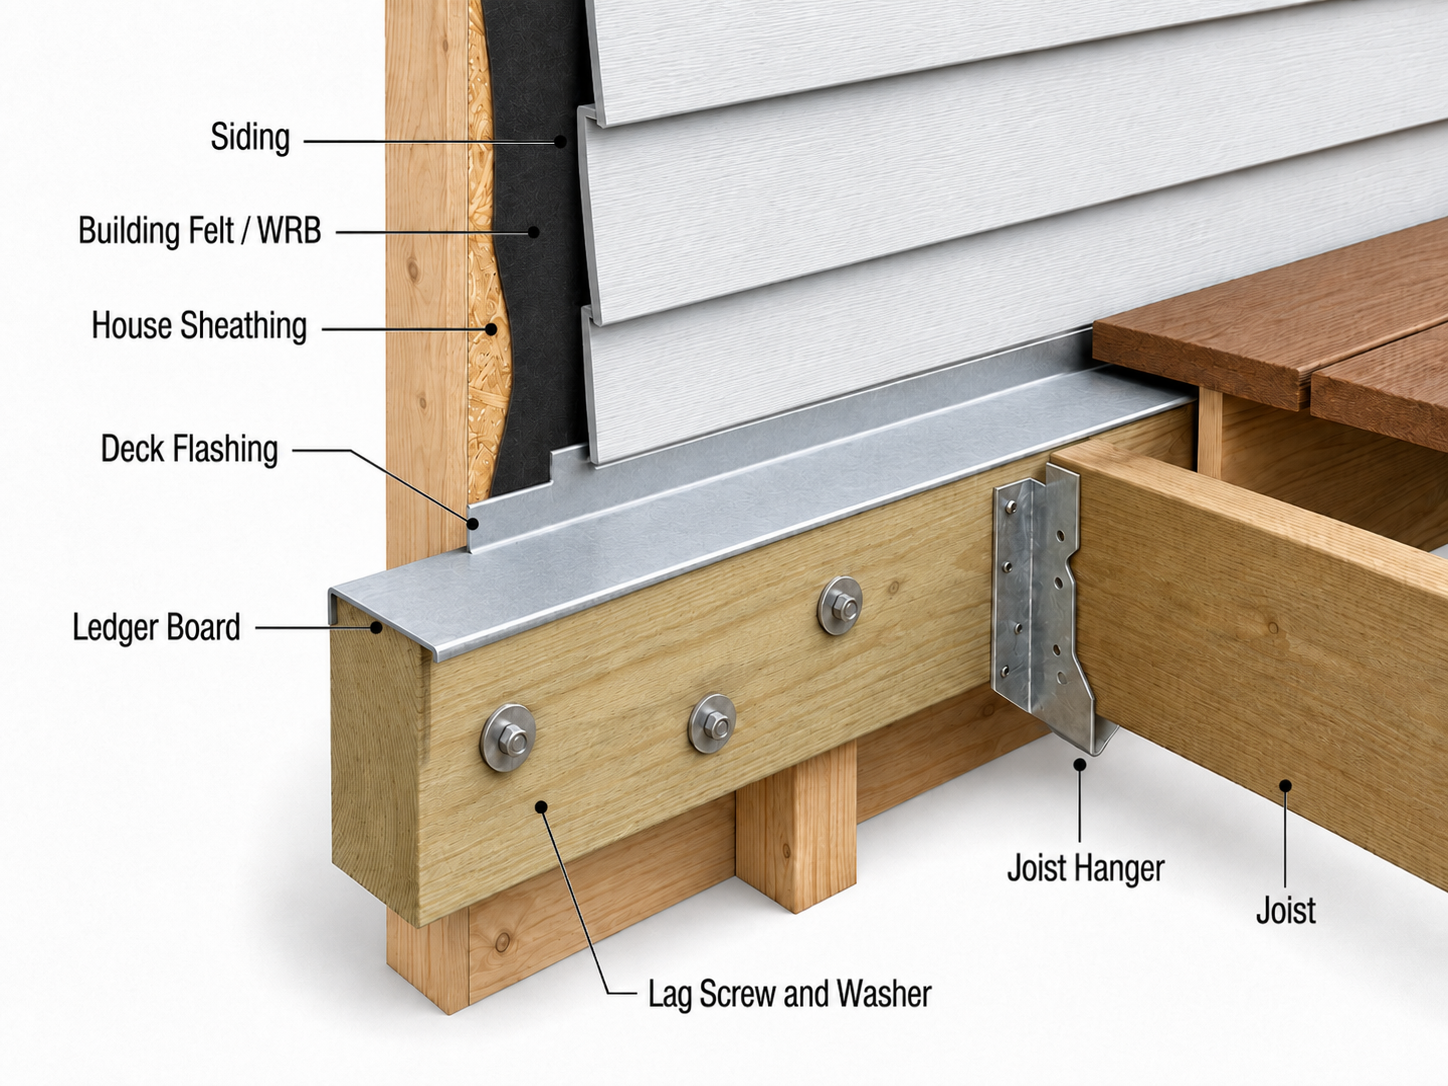
- Remove siding in the ledger area. The ledger should never be installed over siding — the siding must come off.
- Apply a self-adhered membrane directly to the wall sheathing. The membrane should extend at least 4 to 6 inches above the top of where the ledger will sit and 3 to 4 inches below the bottom.
- Install the ledger board with the fasteners required by the applicable IRC table, approved plans, or fastener manufacturer’s evaluation report. If an approved spacer system is being used, follow that system’s instructions. In my experience, most ledger rot doesn’t start on the face of the board. It starts around the fastener penetrations where water repeatedly finds its way into the connection. The flashing and membrane details must be designed to keep water away from those penetrations and move it back to the exterior.
- Apply a second layer of self-adhered membrane along the top of the ledger. This piece runs up the wall and folds over the top edge of the board so water that runs down the wall goes over the front of the ledger rather than behind it.
- Install joist hangers before the metal flashing goes on.
- Install metal Z-flashing over the top of the ledger as the final layer. The house’s water-resistant barrier then laps over the top of the metal flashing.
The critical principle throughout this sequence is simple — every layer laps over the layer below it. Never under it. A single reverse lap at any point can direct water straight into the wall assembly. This is one of the most common construction defects found during structural inspections of failed decks.
Creating the Drainage Gap
Some builders use an approved ledger spacer or standoff system to create a drainage and ventilation gap behind the ledger. The 2024 IRC also recognizes a ledger spaced at least one-quarter inch from the exterior wall covering as an alternative that allows drainage and ventilation behind the board.
But a spaced ledger connection should not be improvised with miscellaneous shims and longer fasteners. Moving the ledger away from the structural framing changes the connection and may change the required fastener type, length, and spacing. When a spacer system is used, it should be a tested or approved system installed according to the manufacturer’s instructions.
A conventional ledger can also be installed against the wall sheathing when the siding has been removed and the flashing is properly integrated with the wall’s drainage plane. In either installation, the goal is the same: prevent water from reaching the band joist and provide a reliable path for incidental moisture to drain and dry.
Fastener Requirements — What the IRC Actually Says
IRC Table R507.9.1.3 governs ledger board fastener size, type, and spacing for residential deck construction. The requirements vary based on lumber species and sheathing thickness — confirm against your locally adopted code edition.
One detail many builders overlook is that the IRC doesn’t just care about the strength of the connection. It also recognizes the importance of keeping water away from it. The code requires deck ledgers to be flashed to prevent water from contacting the house band joist. Anyone who has opened up a failed ledger connection understands why it’s there. Water is the real enemy.
In common prescriptive residential applications, the IRC uses 1/2-inch lag screws or through-bolts, but there is no single standard spacing. The required spacing depends on the deck joist span, fastener type, sheathing thickness, and the material and thickness of the house band or rim joist.
The general requirements most residential applications fall under:
- Fasteners must be hot-dipped galvanized or stainless steel. Plain steel fasteners corrode rapidly in contact with pressure-treated lumber.
- Half-inch diameter lag screws or bolts are required in most residential applications.
- Fasteners must be staggered in two rows to distribute load and avoid splitting the ledger along a single grain line.
- Fastener spacing must be taken from the applicable IRC table or an approved fastener evaluation report. It should not be assumed to be 16 inches on center.
Nails are not acceptable as the sole structural attachment between the ledger board and the house. Decks built before roughly 2000 to 2010 — depending on local code adoption — may still have nail-only ledger connections. Those should be inspected and upgraded.
Substrate-Specific Considerations
The ledger board attachment must account for what it’s attaching through. Different cladding systems create different challenges.
Vinyl or wood siding — remove siding in the ledger area before installation. Never install over siding.
LP SmartSide or other engineered wood siding — particularly vulnerable to moisture intrusion at fastener penetrations. Full siding removal plus membrane flashing at every penetration point is critical.
EIFS or synthetic stucco — a moisture-sensitive cladding system that requires special attention to maintaining the drainage plane behind it. Consult a structural engineer and the EIFS manufacturer’s guidelines before proceeding.
Traditional stucco — must be cut and removed in the ledger area. The cut edge must be properly sealed and flashed.
Brick or stone veneer — IRC Section R507.9.1.1 is explicit: deck ledgers shall not be supported on stone or masonry veneer. Veneer is not structural. It sits approximately one inch away from the wood-framed wall behind it. Attaching a ledger to veneer only risks pulling it off the wall under load. A freestanding deck is typically the right solution here.
Can a Deck Ledger Be Attached to a Cantilevered Floor?
This is one of those situations where the answer is — it depends.
Many cantilevered floor systems are poor candidates for ledger attachment because the loads from the deck may not transfer properly back into the home’s structure. In some cases attaching a ledger can overstress framing members that were never designed to carry deck loads.
That doesn’t mean it can never be done. Some engineered floor systems can accommodate it when designed and detailed correctly.
The problem is that most homeowners — and unfortunately some contractors — don’t know which situation they’re dealing with.
If the deck connection falls within a cantilevered area, consult the engineered floor manufacturer’s requirements or a structural engineer before attaching the ledger. When the framing can’t be verified, a freestanding deck is usually the better solution.
How to Inspect an Existing Deck Ledger Board
A visual inspection of an existing ledger board should cover the following:
- Look for visible metal flashing at the top of the ledger when viewed from below. If you can’t see any flashing, consider it a red flag, although some properly installed flashing may be concealed behind the siding.
- Probe the ledger board and rim joist area with a screwdriver or awl. Pay particular attention to areas immediately surrounding lag screws and bolts, since rot often begins there first.
- Check fasteners for heavy corrosion. Significant rust on fastener heads indicates moisture intrusion and potentially compromised structural capacity.
- Look for staining or discoloration on the house siding above the ledger — a sign that water is backing up behind the board rather than draining away.
- Check whether the flashing and drainage details are keeping moisture from becoming trapped behind the ledger. Staining, soft wood, corrosion, or persistent dampness are signs that the connection needs closer inspection.
- If the deck predates current code requirements, verify whether the ledger is attached with bolts, lag screws, approved structural screws, or nails alone.
When in doubt have it evaluated by a structural engineer. A deck ledger failure doesn’t give much warning.
Freestanding Deck vs Ledger Board — When to Choose Each
A ledger board attached deck requires fewer footings and posts because the house carries part of the load. It’s generally the more economical option when the house framing is accessible, the siding is compatible, and the installation can be done correctly.
A freestanding deck is the right call when:
- The house has brick, stone, or masonry veneer siding
- The house has EIFS cladding that can’t be properly waterproofed at the ledger connection
- The deck attaches at a cantilevered floor section that can’t support ledger loads
- The existing house framing can’t be verified as structurally sound
- The homeowner wants to eliminate moisture intrusion risk at the house connection entirely
Freestanding decks require additional footings drilled below the frost line. In most situations the added footing cost is modest compared to the cost of repairing moisture damage from a failed ledger connection.
Get the Ledger Right Before the Deck Goes On
I’ve seen homeowners spend thousands of dollars on premium decking, custom railings, lighting, and stairs while the ledger connection behind it was quietly deteriorating. The irony is that the most important part of an attached deck is the part nobody sees. Get the ledger board right and the rest of the deck has a chance to last for decades. Get it wrong and everything built on top of it is at risk.
Frequently Asked Questions
Why do deck ledger boards rot even when pressure treated? Pressure-treated lumber resists rot but is not immune to it — especially at fastener penetration points where the treatment doesn’t fully penetrate. When water is consistently present at those points without a drainage path, rot develops over time regardless of treatment level.
What is the correct flashing sequence for a deck ledger board? Membrane to the sheathing first. The ledger board comes next, using an approved spacer system if the installation calls for one. Membrane over the top of the ledger comes next, followed by the joist hangers and metal Z-flashing. Every layer must lap over the layer below it — never under it.
Can I attach a deck ledger to engineered wood siding or EIFS? Engineered wood siding requires full removal in the ledger area and careful sealing at every fastener penetration. EIFS requires consultation with a structural engineer and strict adherence to manufacturer guidelines. IRC Section R507.9.1.1 prohibits ledger attachment to stone or masonry veneer.
How do I know if my deck ledger board needs to be replaced? Probe the ledger and rim joist area with a screwdriver. Soft or spongy wood is rot. Heavy fastener corrosion, visible staining, soft wood, and evidence of moisture becoming trapped behind the ledger are all red flags that warrant a closer professional assessment.
What does the IRC require for deck ledger board fasteners? IRC Table R507.9.1.3 requires hot-dipped galvanized or stainless steel fasteners — typically half-inch diameter lag screws or bolts staggered in two rows. Nails alone are not acceptable as the structural ledger attachment. Confirm specific spacing requirements against your locally adopted code edition.