A crawl space can look completely dry and still be loading the house above it with moisture. The problem usually starts with a construction decision made before anyone poured a footing — a decision about where water, air, and the thermal boundary are going to be managed. Understanding crawl space moisture starts with understanding what those decisions actually control.
Why Crawl Spaces Have a Moisture Problem by Design
For decades the standard approach to residential crawl spaces was straightforward: cut foundation vents, insulate between the floor joists, and let outside air move through. The theory was that ventilation would carry moisture out and keep things dry.
That theory has a flaw. In humid weather, the air being brought in is often the moisture source.
On a warm summer day, outdoor air can carry a substantial load of water vapor. When that air enters a vented crawl space beneath an air-conditioned house, it hits cooler surfaces — floor joists, subflooring, ducts, pipes, foundation walls. As the air cools, its relative humidity rises. If a surface drops below the dew point of that incoming air, water condenses on it.
That’s why you can crawl under a house in July in a humid climate and find damp joists when there’s no plumbing leak and no standing water anywhere. The ventilation system installed to dry the crawl space is delivering the moisture that’s wetting it.
Building America research confirmed this. In humid climates, outdoor air is often more moisture-laden than crawl space air, and research comparing vented crawl spaces with closed conditioned spaces consistently found lower humidity in the conditioned approach. Building Science Corporation put it plainly: when outdoor air has a dew point above the temperature of crawl space surfaces, ventilation creates moisture problems rather than solving them.
That doesn’t mean every vented crawl space fails in every climate. The 2024 International Residential Code still provides compliant paths for both vented and unvented crawl spaces. The IRC is a model code; the requirements that govern a particular project depend on the edition adopted by the local jurisdiction and any local amendments. What it means is that a vented design in a mixed-humid or warm-humid climate has to be evaluated against actual conditions — not against the assumption that more outside air always means more drying.
The Building Boundary Has to Be Somewhere
Every crawl space design answers one fundamental question: is the crawl space outside the conditioned enclosure or inside it?
A traditional vented crawl space puts the thermal and air boundary at the floor above. The crawl space is treated as exterior space — connected to outdoor air, insulated at the floor, deliberately open to outside conditions.
An encapsulated approach moves that boundary outward. The ground is isolated, exterior openings are sealed, the perimeter is air sealed and insulated, and humidity is controlled so the crawl space behaves more like a small basement than like a vented attic.
Problems start when those two strategies get mixed without thinking through what that means. Close some vents, leave others open, throw down some plastic, add a dehumidifier, and hope the crawl space finds its own equilibrium — that’s not a strategy. That’s how you end up with a crawl space moisture problem that nobody can explain.
The Three Sources of Crawl Space Moisture
A wet crawl space doesn’t have one universal cause. Soil vapor, exterior air infiltration, and bulk water intrusion are three separate moisture loads. Fixing one doesn’t automatically control the others.
Soil Vapor
Bare earth is a continuous moisture source whether or not it looks wet. Water in the soil migrates upward and evaporates into the crawl space air, raising humidity until wood framing and other organic materials start absorbing it. You don’t need standing water to get wet joists. You need time and exposed soil.
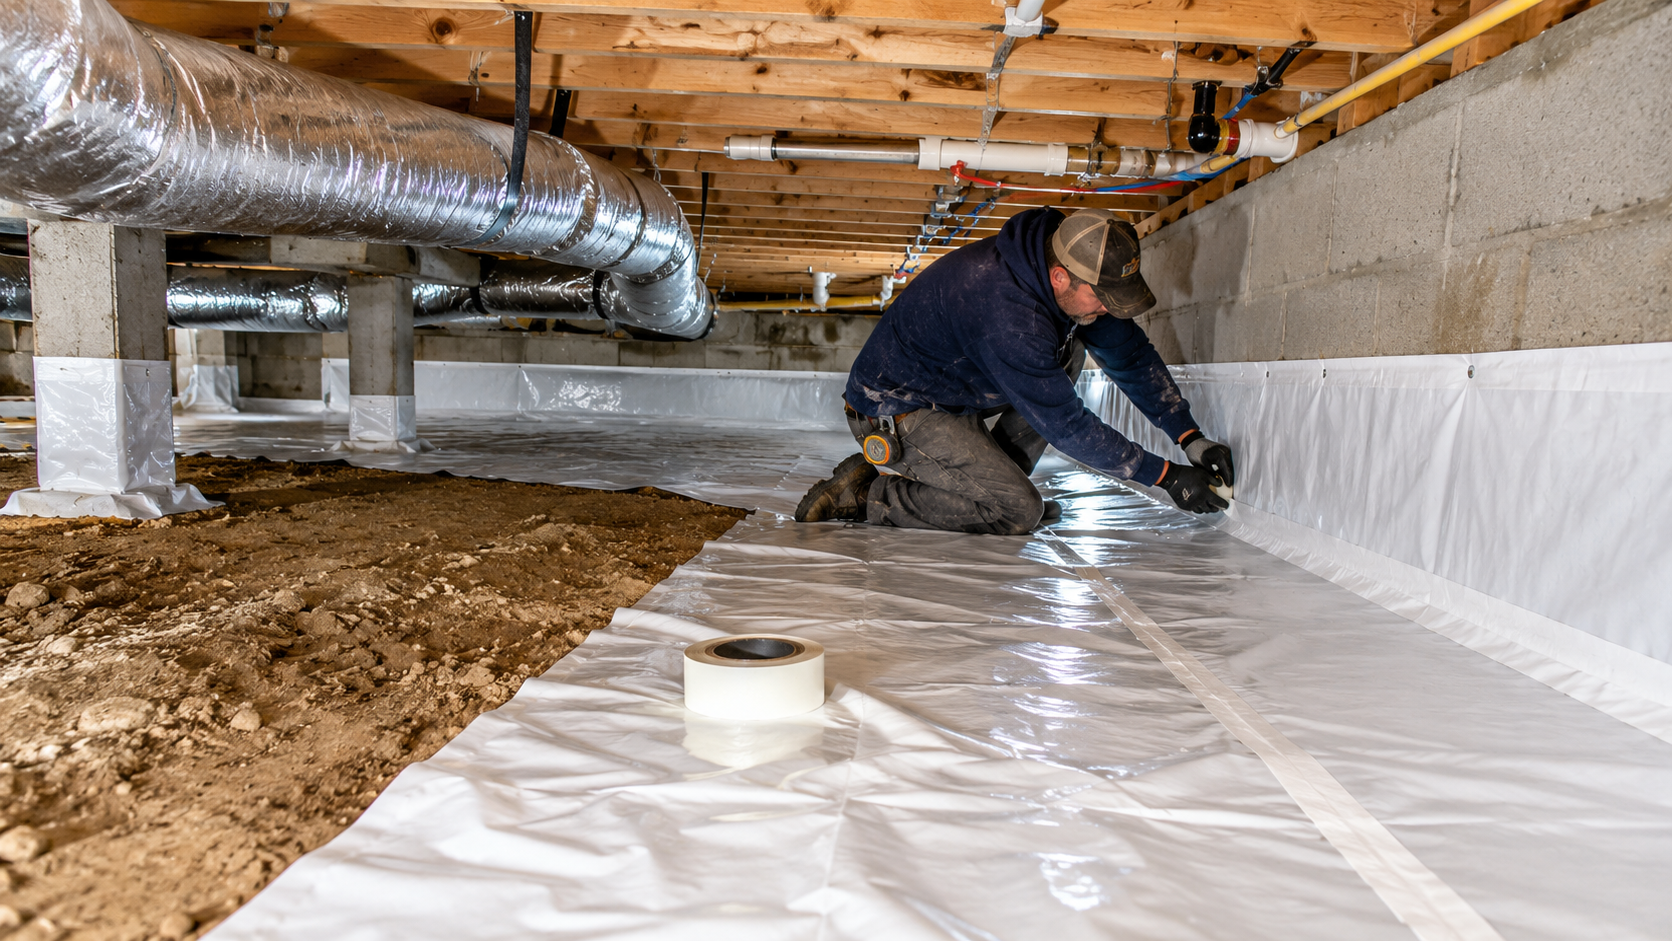
The primary control is a continuous ground vapor retarder. If the plastic is torn, poorly lapped, pulled away from piers or the perimeter, or missing around penetrations, the soil keeps feeding moisture into the space regardless of what else you’ve done.
Exterior Air Infiltration
In a vented crawl space, humid outdoor air enters deliberately through foundation vents. It also enters through access doors, foundation gaps, poorly sealed penetrations, and any opening that connects the crawl space to outside. A ground cover does nothing to stop this source. You can cover every square foot of soil and still have a moisture problem because the moisture is arriving through the vents, not from the ground.
That’s why adding vent area is not a universal solution to a damp crawl space in a humid climate. More air exchange can mean more moisture delivered to cool surfaces, not less.
Bulk Water Intrusion
Bulk water is a drainage problem until proven otherwise. Roof runoff discharged next to the foundation, negative site grading, settled backfill, poorly located downspouts, high groundwater, failed foundation drains, and foundation wall leakage can all send liquid water beneath a house.
The 2024 IRC requires lots to drain surface water away from foundation walls — generally 6 inches of fall within the first 10 feet unless drains or swales are used. IRC Section R405.1 also requires drainage around concrete or masonry foundations that retain earth and enclose usable or habitable below-grade spaces, with an exception for qualifying well-drained Group I soils. That requirement exists because the best place to stop bulk water is outside the foundation, not inside it.
A liner over a drainage failure doesn’t correct the drainage failure. If water is running across the ground beneath the liner or entering through the foundation wall, the drainage problem has to be addressed first. Ground vapor control belongs in the system, but it shouldn’t be used to hide water that shouldn’t be there.
What a Vapor Barrier Actually Does — and What It Doesn’t
A ground vapor retarder has one primary job: reduce the movement of water vapor from soil into the crawl space air. That’s a meaningful job, but it’s not every job.
A ground cover does not stop humid outdoor air from entering through open foundation vents. It does not correct negative grading, redirect roof runoff, repair foundation leakage, control groundwater, air seal the rim joist, or determine where the thermal boundary belongs.
That distinction matters because in a lot of crawl spaces, the plastic on the ground gets treated as the entire moisture control system. It isn’t.
On the six-mil poly question: There’s a tendency to treat 6-mil polyethylene as automatically wrong for crawl space use. That’s too broad. DOE guidance calls for polyethylene sheeting of at least 6 mil over crawl space soil, with seams overlapped and sealed, penetrations sealed, and the material extended up walls and piers. The 2024 IRC’s unvented path requires a continuous Class I vapor retarder — defined as 0.1 perm or less — with joints overlapped at least 6 inches and sealed, edges extending at least 6 inches up the stem wall, attached and sealed.
The better questions aren’t about thickness alone. What is the tested permeance? How will it hold up to people crawling over it to service plumbing and HVAC? How are seams, piers, penetrations, and the perimeter wall treated? A purpose-made crawl space liner with tested puncture resistance and a permeance well below 0.1 perm may serve better than commodity poly in a space that sees regular service traffic. But a 15-mil liner full of holes is not a better moisture control layer than properly installed material that stays continuous.
Specify the installed system — permeance, seams, wall terminations, penetration seals — not just the roll that goes on the ground.
Vented vs. Encapsulated: What the Building Science Actually Says
The industry didn’t move toward closed crawl spaces because encapsulation became a profitable remodeling pitch. Research documented a specific problem with the assumption behind traditional crawl space venting in humid climates, and code eventually caught up.
DOE’s Building America work comparing closed conditioned crawl spaces with traditional vented designs found reduced humidity and lower heating and cooling energy use in the conditioned approach. Building Science Corporation’s field work reached similar conclusions — conditioned crawl spaces outperformed vented ones on moisture, comfort, durability, and energy use when the perimeter was brought inside the building enclosure rather than insulating between the floor joists.
That’s the argument for encapsulation. It’s not “plastic is better than vents.” It’s that the control strategy matters and a vented design in a humid climate is fighting a battle it often can’t win.
What encapsulation actually involves:
A properly designed unvented crawl space controls the major moisture pathways as a system. The ground gets a continuous vapor retarder. Exterior vents and uncontrolled openings are sealed. Air leakage at the rim joist, penetrations, access door, and perimeter is addressed. Insulation goes at the perimeter rather than between the floor joists above. And the space gets a deliberate humidity control strategy.
The 2024 IRC reflects that systems approach. Section R408.3’s unvented path requires the continuous Class I ground vapor retarder plus one of several mechanical control options — mechanical exhaust with an air pathway, conditioned air supply, or dehumidification sized to the manufacturer’s specifications.
That’s considerably different from rolling out plastic and closing the vents.
A dehumidifier is not an air sealing strategy. The IRC recognizes dehumidification as a compliant humidity control option for an unvented crawl space — but notice where that dehumidifier appears: after the crawl space has been defined as unvented and the ground has been covered with a continuous Class I vapor retarder. Leaving foundation vents open, ignoring air leakage at the rim, and installing a dehumidifier asks one piece of equipment to fight a moisture load the enclosure is still deliberately letting inside. That’s not the same design.
What Contractors Get Wrong
Most crawl space moisture failures don’t come from one spectacular mistake. They come from a series of details that individually look minor but collectively leave the assembly with no clear control strategy for water, air, vapor, or heat.
They try to solve a drainage problem from inside. The first place I’d look at a wet crawl space is outside the crawl space. Where does the roof water go? Do downspouts discharge next to the foundation? Did the backfill settle? Does the grade pitch toward the house? Exterior grading and drainage are part of the water control system because the best place to stop bulk water is before it reaches the foundation. A liner should not become a pond liner for a drainage problem that should have been corrected outside.
They treat more vents as the answer. The 2024 IRC’s prescriptive vented path requires at least 1 square foot of net vent area for each 150 square feet of under-floor area and a vent within 3 feet of each exterior corner. Meeting that calculation doesn’t change the moisture content of humid outdoor air. Adding vents may increase air exchange and still make summer moisture conditions worse in a humid climate. Vent sizing and the vented-vs-unvented decision aren’t the same question.
They stop the ground cover at the wall. Sheets of poly across most of the dirt floor are better than bare soil, but they’re not the same as a continuous vapor control layer. Seams matter. Piers matter. Penetrations matter. The perimeter matters. For the IRC unvented path, the vapor retarder extends at least 6 inches up the stem wall, attached and sealed, with joints overlapped and sealed. If the project is called encapsulated, the installation should look intentional at every termination — not like someone unrolled some plastic and left.
They put HVAC equipment in a bad environment. A vented crawl space can contain some of the coldest surfaces beneath a house because air conditioning ducts are running cold air through humid surroundings. DOE guidance recommends locating ducts in conditioned space where practical. When ducts have to stay in an unconditioned vented crawl space, they need appropriate sealing, insulation, and vapor control. Duct leakage in a vented crawl space draws crawl space air into the return system and wastes conditioned air through supply leaks. If you’re going to put mechanical equipment beneath a house, design the surrounding enclosure so that equipment isn’t effectively operating outdoors.
They put the insulation on the wrong side of the boundary. You can’t choose the insulation location independently from the crawl space strategy. Vented crawl space — thermal boundary is at the floor above, insulation goes between the joists. Encapsulated crawl space — boundary moves to the perimeter, insulation goes on the foundation walls and rim, not between the joists.
The 2024 IRC adds another wrinkle in warm-humid locations. In Climate Zones 1A, 2A, and 3A below the warm-humid line, air-permeable insulation between floor joists in a vented crawl space requires a continuous Class I or II vapor retarder on its exposed crawl-space face, unless the space complies with the unvented provisions of R408.3. That provision reflects exactly the problem this article describes — vented crawl spaces in humid climates create conditions where even correctly installed floor insulation needs additional vapor protection on its exposed face.
The bad detail is the half-conversion: vents sealed, floor insulation hanging between joists, walls uninsulated, rim leaking, ground plastic incomplete, and a dehumidifier sitting in the middle trying to make the assembly perform like a design it was never built to be.
What to Verify Before Closing Up a Crawl Space
Crawl space moisture control starts with verifying the water, air, vapor, thermal, and mechanical details before access becomes difficult and mistakes disappear behind insulation and flooring.
Before the floor system is closed:
- Verify exterior grade. Confirm the site drains away from the foundation. Check for settled backfill, hardscape that’s pitched toward the house, or low areas trapping water against the wall.
- Verify roof drainage. Gutters, leaders, and downspouts should discharge where water can move away from the foundation.
- Resolve bulk water first. Look for groundwater, wall leakage, footing drain problems, plumbing leaks, and low areas. Cover the ground after the water is controlled, not instead of controlling it.
- Specify the vapor retarder as a system. Identify the vapor retarder class, tested permeance, material, seam treatment, wall termination, pier and penetration details, and protection against punctures — not just the roll going on the ground.
- Choose vented or unvented intentionally. Don’t close some vents, leave others open, and expect the crawl space to find equilibrium on its own.
- Air seal an unvented design. Rim joists, penetrations, access doors, former vent openings — every connection between the sealed crawl space and the exterior needs attention.
- Put insulation at the correct boundary. Coordinate with the energy code and the control strategy. Don’t insulate the floor above and the perimeter walls both, then seal the vents and call it encapsulated.
- Coordinate HVAC equipment and ducts. Duct insulation, air sealing, condensate drainage, and whether the mechanical equipment is inside or outside the conditioned enclosure all need to be resolved before framing covers the ductwork.
- Plan deliberate humidity control. For an unvented design, identify the IRC-compliant strategy — conditioned air, mechanical exhaust, or dehumidification — before the space is called complete.
- Photograph before concealment. Document the ground liner, perimeter seals, drainage details, air sealing, ductwork, and insulation before future work makes those conditions impossible to verify.
A crawl space should be a coherent part of the building enclosure, not a collection of unrelated details beneath the floor. By the time it’s closed up, you should be able to point to the drainage plane, vapor control layer, air boundary, thermal boundary, and humidity control strategy and explain exactly how each one works together.
The expensive problems happen when builders treat the space below the floor as an afterthought. Moisture doesn’t care that nobody planned to spend much time down there.
Build Better Technical Content With RoderickContent.com
Technical construction content works better when the writer understands how individual materials and details affect the complete building assembly. I help manufacturers and agencies create content grounded in field experience, building science, and the practical decisions contractors make on real projects. Reach out today and lets discuss your next project.